

In the world of big data analytics, the ability to manage, process, and extract valuable insights from vast amounts of data is essential for modern businesses. A well-structured data architecture plays a crucial role in achieving this goal, and the medallion architecture, a concept pioneered by Databricks, has emerged as a popular design pattern.
The medallion architecture provides a layered approach to organizing data within a data lake or lakehouse. It divides data into three primary layers:
Bronze: Stores raw, unprocessed data as it arrives from various sources.
Silver: Contains cleansed, validated, and enriched data, ready for further analysis.
Gold: Houses highly aggregated and business-ready data, optimized for consumption by analytics tools, dashboards, and machine learning models.
Azure Data Factory (ADF) and Databricks offer a powerful combination of tools for implementing a medallion architecture within the Azure cloud ecosystem. Azure Data Factory delivers robust orchestration and integration capabilities, including Change Data Capture (CDC) for streamlined data ingestion, while Databricks provides a unified analytics platform with its Spark environment, collaborative notebooks, and scalability for data transformation.
In this article, we’ll guide you through the process of setting up this architecture one layer at a time using Databricks and Azure Data Factory, leveraging Terraform for infrastructure as code to ensure reproducibility and maintainability.
Setting up your Azure Environment
Prerequisites
Before diving into the setup process, ensure you have the following prerequisites in place:
Active Azure Subscription: You’ll need an active Azure subscription to provision the required resources. Most of the resources on this page will cost you money, but Azure offers $200 in credit for new accounts.
Basic Cloud Concepts: Familiarity with fundamental cloud concepts will help follow this tutorial.
Terraform Basics: A basic understanding of Terraform syntax and concepts will make it easier to follow the code examples. The resources will be created using Terraform 1.7.4.
Let’s start coding! This will be our starting Terraform repo structure:
$ tree
.
├── config
│   └── dev.config.json
├── modules
├── _data.tf
├── _locals.tf
├── _outputs.tf
├── _state.tf
├── _variables.tf
├── _versions.tf
└── main.tf
All the basic terraform files are prefixed with _ to make them easily identifiable. modules is a folder where we may add external modules for the Terraform registry, and main.tf is a placeholder file for now.
It is good practice to always have a config file to define your variables. This will encourage us to not hardcode any values, and make this project highly reusable if we later decide to deploy this set of resources to a production environment. Here it will be defined in config/dev.config.json. Likewise, our Terraform state will have its environment-specific state in config/dev.backend.tfvars.
To make sure we can properly initialize our projects, we first need to pin our TF and provider versions in versions.tf. This will ensure we don’t have any compatibility further down the road.
We will also populate _state.tf file to define our remote state, in my case, I will be using an Azure blob container as the backend. But you can choose something else or just use a local state by not defining any backend blocks.
## _version.tf
# Define Azure as our main provider
provider "azurerm" {
  features {}
}

# Pin Terraform and Azure provider versions
terraform {
  required_version = ">= 1.7.4"

  required_providers {
    azurerm  = "~>3.0"
  }
}

## _state.tf
# Remote state
terraform {
  backend "azurerm" {
    key                  = "terraform.tfstate"
  }
}

## config/dev.backend.tfvars
resource_group_name  = ${your_resource_group_name}
storage_account_name = ${your_storage_account_name}
container_name       = ${your_container_name}
Bronze: The Embarkation Point
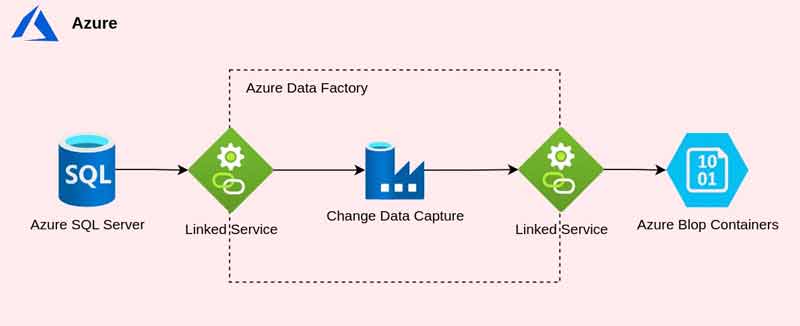
The primary objective of the bronze layer is to collect raw data from its sources and reliably store it within our Azure environment. We’ll leverage Azure Data Factory’s Change Data Capture capabilities along with Azure Storage for efficient ingestion and storage of data from an Azure SQL Server database.
Prerequisites:
SQL Server with CDC Enabled: Ensure that Change Data Capture is enabled on your SQL Server database and the relevant tables. You can find instructions on how to do this in the Microsoft documentation: https://learn.microsoft.com/en-us/sql/relational-databases/track-changes/enable-and-disable-change-data-capture-sql-server?view=sql-server-ver16
If you don’t have an SQL server in hand, you can also use an Azure blob container as the source for our data. Just make sure you have one created already.
Azure Data Factory
##... (Previous Terraform code for Resource Group, Storage Account, etc.) ...

## adf.tf
# Azure Data Factory
resource "azurerm_data_factory" "default" {
  name                = var.data_factory_name
  location            = var.location
  resource_group_name = azurerm_resource_group.lakehouserg.name
}

# Linked Service to SQL Server (Source)
resource "azurerm_data_factory_linked_service_sql_server" "sql_server_source" {
  data_factory_id   = azurerm_data_factory.default.id
  name              = "source_sql_linked_service"
  connection_string = var.source_sql_server_connection_string
}

# Linked Service to Blob storage (destination)
resource "azurerm_data_factory_linked_service_azure_blob_storage" "cdc_storage" {
  connection_string_insecure = var.destination_storage_connection_string_insecure
  data_factory_id            = azurerm_data_factory.default.id
  name                       = "destination_sql_linked_service"
  use_managed_identity       = true
}

## _variables.tf
# Add default values, description if needed
variable "location" {}
variable "resource_group_name" {}
variable "data_factory_name" {}
variable "source_sql_server_connection_string" {}
variable "destination_storage_connection_string_insecure" {}

# config/dev.config.tfvars
location = ""
resource_group_name = ""
data_factory_name = ""
source_sql_server_connection_string = "" # in the format of: "Server=yourservername.database.windows.net;Database=yourdatabasename;User ID=yourusername;Password=yourpassword"
destination_storage_connection_string_insecure = "" # in the format of "DefaultEndpointsProtocol=https;AccountName=lakehouse;EndpointSuffix=core.windows.net;"
“This is a simplified example. Your actual Terraform file will likely have more details like variable definitions, security configurations, and potentially other resources that I have skipped like the Azure resource group.”
We start by defining our data factory resource, azurem_data_factory. To define our source data, we need to create a corresponding linked service. A Linked Service will establish a trusted connection between our database and ADF, which will be used by the CDC mechanism. In Terraform this is done using the azurem_data_factory_linked_service_* , where * is your source type. You can find other types of linked services, like blob storage in the documentation.
Change Data Capture
As of February 2024, the Change Data Capture service of ADF is sadly not supported by Terraform. This means, don’t run away, that we have to do Clickops until Azure releases programmatic access.
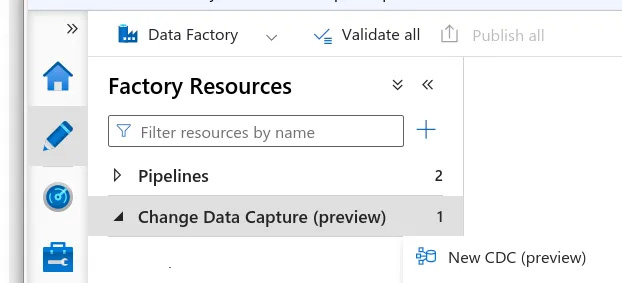
Launch your Data Factory created in the previous step, and head to Author > Change Data Capture > New CDC.
You will be prompted to give the following:
- CDC name
- Source type
- Source linked service
- Source tables
- Target type
- Target linked service
- Target folder path
Make sure you give the resources we previously created (source SQL server and destination blob container). You can also specify which tables to ingest, as well as the destination folder.
Once done, Change data capture will automatically map each table to a respective folder within your destination. You can also set a different latency, the default being every 15 minutes. From my experience, setting the latency to real-time doesn’t always work correctly.
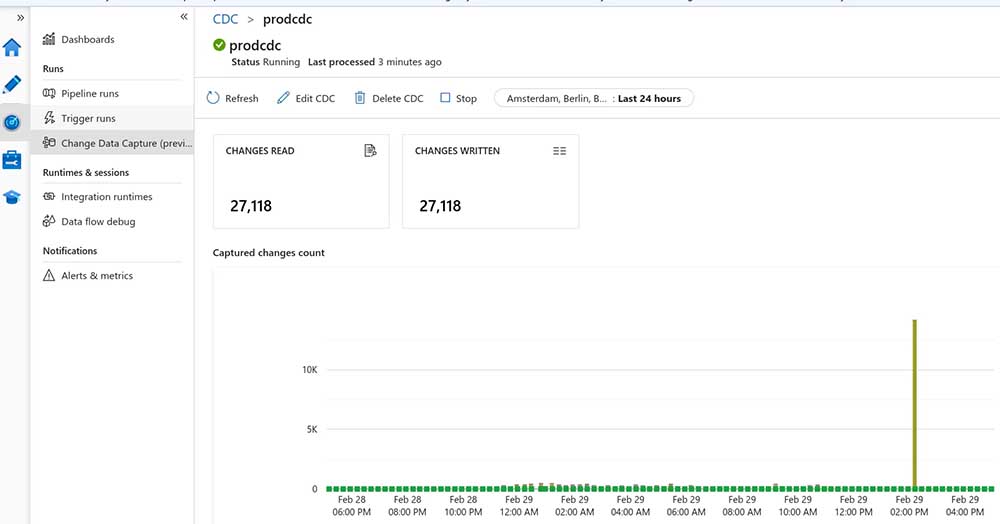
Make sure you publish your changes, and in Monitor > Change Data Capture, you should start seeing data coming through.
With the Bronze layer infrastructure in place, we’re ready to move on to Silver, where we’ll focus on using Databricks to transform and enrich the ingested data.
Stay tuned for Deploying a Medallion Architecture on Azure, Part 2!